I2C 통신
2024. 7. 4. 15:21ㆍLiDAR
✅ I2C 통신


✅ RFID - RC522

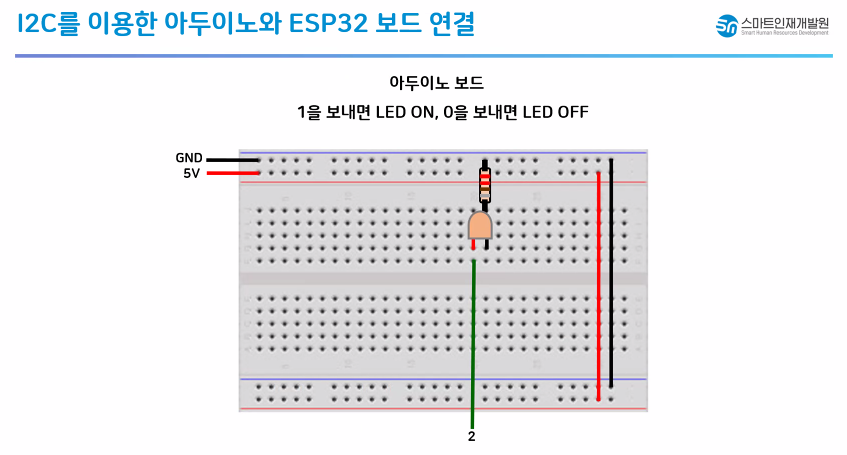
✅ I2C를 이용한 아두이노와 ESP32 보드 연결


#include <Wire.h>

const byte address = 0x3F; // 통신에서 사용할 주소

void setup() {
  Serial.begin(9600);
  Serial.println("I2C test !!");

  Wire.begin(address);
  Wire.onReceive(receiveEvent);
}

void loop() {
  delay(500);
}

void receiveEvent(int howMany) {
  while(Wire.available()) {
    char c = Wire.read();
    Serial.println(c);
  }
}
#include <Wire.h>
const byte address = 0x3F; // 통신에서 사용할 주소
void setup() {
Serial.begin(9600);
Wire.begin();
}
void loop() {
if (Serial.available()) {
char c = Serial.read();
Wire.beginTransmission(address); // 통신 주소를 설정한다
Serial.println(c); // 데이터를 슬레이브 장치로 전송한다
Wire.write(c); // 데이터 전송을 종료한다
Wire.endTransmission();
}
}

#include <Wire.h>

const byte address = 0x3F; // 통신에서 사용할 주소

void setup() {
  Serial.begin(9600);
  Serial.println("I2C test !!");

  Wire.begin(address);
  Wire.onReceive(receiveEvent);
}

void loop() {
  delay(500);
}

void receiveEvent(int howMany) {
  while(Wire.available()) {
    char c = Wire.read();
    Serial.println(c);
  }
}

#include <Wire.h>

void setup() {
  Serial.begin(9600);

  // I2C 통신 초기화 (0을 보냄)
  Wire.begin();

  for (byte i = 1; i < 120; i ++) {
    Wire.beginTransmission(i);

    // I2C 통신이 연결 중이라면

    if (Wire.endTransmission() == 0) {
      Serial.print("Address : ");
      Serial.print("0x");
      Serial.println(i, HEX);

      delay(10);
    }
  }
}

void loop() {
}
#include <Wire.h>

const byte address = 0x3F; // 통신에서 사용할 주소

void setup() {
  Serial.begin(9600);
  Wire.begin();
}

void loop() {
  int val = analogRead(2);

  Wire.beginTransmission(address);

  Serial.println(val);

  Wire.write(val);
  Wire.endTransmission();

  delay(1000);
}
#include <Wire.h>
// #include <LiquidCrystal_I2C.h>

const byte address = 0x3F;
// LiquidCrystal_I2C lcd(0x27, 16, 2);

void setup() {
  // lcd.init();
  // lcd.backlight();

  Serial.begin(9600);
  Serial.println("I2C test !!");

  Wire.begin(address);
  Wire.onReceive(receiveEvent);
}

void loop() {
  delay(500);
}

void receiveEvent(int howMany) {
  while (Wire.available()) {
    char c = Wire.read();

    Serial.print(c);

    // lcd.setCursor(0, 1);
    // lcd.print(c);
  }
}
#include <Wire.h>
const byte address = 0x3F; // 통신에서 사용할 주소
void setup() {
Serial.begin(9600);
Wire.begin();
}
void loop() {
int val = analogRead(39);
Wire.beginTransmission(address);
Serial.println(val);
Wire.println(val);
Wire.endTransmission();
delay(1000);
}
✅ 2개 이상의 I2C 통신 장치 연결

'LiDAR' 카테고리의 다른 글
| LiDAR 센서 이해하기 (0) | 2024.07.09 |
|---|---|
| ROS(Robot Operating System) (0) | 2024.07.08 |
| RFID (0) | 2024.07.08 |
| Processing (0) | 2024.07.05 |